Rooting Your BERG Cloud Bridge
WARNING - This will void your warranty, and could completely break your hardware. Proceed at your own risk.
Step 1 - Physical Access
Remove the rubber feet covering the screws on the bottom of the bridge, then unscrew the base plate. Be careful with the screws - I managed to ruin the head of one of them and had to dremel my way in.
Step 2 - Console Access
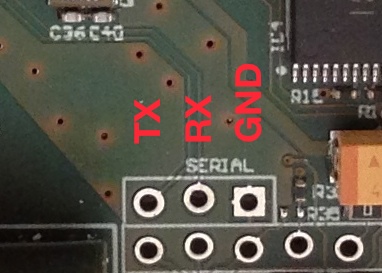
For this step you'll need some way of connecting your computer to the serial header on the bridge. I used an Arduino Uno board with the reset pin connected to ground to fill in as a USB to serial converter. You need to connect it like so:
- Arduino GND -> Bridge GND
- Arduino TX -> Bridge RX
- Arduino RX -> Bridge TX
The holes on the bridge aren't labelled, so here's an annotated image:
Once the bridge is hooked up, run the following command (substituting in the correct device path for your computer):
screen /dev/tty.usbmodem1411 115200 8N1
Now connect the power to the bridge, and you should see the bridge start to boot:
RomBOOT
Start AT91Bootstrap...


U-Boot 2012.04.01 (Sep 18 2012 - 14:24:35)

CPU: AT91SAM9G20
Crystal frequency:   18.432 MHz
CPU clock        :  396.288 MHz
Master clock     :  132.096 MHz
DRAM:  32 MiB
WARNING: Caches not enabled
NAND:  256 MiB
In:    serial
Out:   serial
Err:   serial
Net:   macb0
macb0: Starting autonegotiation...
After a few seconds, you'll get a login prompt:
BERG Cloud Bridge
berg-cloud-bridge-p9tsmuspj login:
Woooo! Except we don't know the username or password :-(.
Step 3 - Booting in to single user mode
During the boot process, this message is displayed:
Hit any key to stop autoboot:
If we press a key, we get to a U-Boot prompt:
Hit any key to stop autoboot:  0
U-Boot>
We have to be quick here, as the prompt will timeout fairly quickly and reset the bridge:
U-Boot>
Timeout waiting for command
resetting ...
Running the help command at the prompt displays all the commands we can run, including this interesting one:
printenv- print environment variables
The particular environment variable we're interested in is this one:
bootargs=console=ttyS0,115200 root=/dev/mtdblock5 mtdparts=atmel_nand:128k(bootstrap)ro,256k(uboot)ro,128k(env1)ro,128k(env2)ro,2M(linux),-(root) rw rootfstype=jffs2
These arguments are passed to the kernel at boot, but any it doesn't use are passed on to the first process that the kernel starts, which in this case is init. And init, when given the argument single, boots in to single user mode. We can use the setenv command to do this:
U-Boot> setenv bootargs "console=ttyS0,115200 root=/dev/mtdblock5 mtdparts=atmel_nand:128k(bootstrap)ro,256k(uboot)ro,128k(env1)ro,128k(env2)ro,2M(linux),-(root) rw rootfstype=jffs2 single"
And then check the result using printenv:
bootargs=console=ttyS0,115200 root=/dev/mtdblock5 mtdparts=atmel_nand:128k(bootstrap)ro,256k(uboot)ro,128k(env1)ro,128k(env2)ro,2M(linux),-(root) rw rootfstype=jffs2 single
Finally, issue the boot command to boot using the current bootargs. You should get to a prompt:
VFS: Mounted root (jffs2 filesystem) on device 31:5.
Freeing init memory: 124K
#
Nearly there now. Run mount -a to mount all the file systems, which should mount the following:
rootfs on / type rootfs (rw)
/dev/root on / type jffs2 (ro,relatime)
proc on /proc type proc (rw,relatime)
devpts on /dev/pts type devpts (rw,relatime,gid=5,mode=620)
tmpfs on /dev/shm type tmpfs (rw,relatime,mode=777)
tmpfs on /tmp type tmpfs (rw,relatime)
sysfs on /sys type sysfs (rw,relatime)
We want to change the root password, but if we were to do that at the moment, our changes wouldn't be preserved upon boot as /dev/root is mounted read only (ro). We can fix that using this command:
mount -o remount,rw /
Check that it's now mounted correctly using the mount command:
# mount
rootfs on / type rootfs (rw)
/dev/root on / type jffs2 (rw,relatime)
proc on /proc type proc (rw,relatime)
devpts on /dev/pts type devpts (rw,relatime,gid=5,mode=620)
tmpfs on /dev/shm type tmpfs (rw,relatime,mode=777)
tmpfs on /tmp type tmpfs (rw,relatime)
sysfs on /sys type sysfs (rw,relatime)
Now we can run passwd to change the root password:
# passwd
Changing password for root
New password:
Set your new root password, and then run reboot. The bridge will boot to a login prompt (not in to single user mode - the change we made in the U-Boot console earlier wasn't persisted). But now we know the username and password, so we can log in:
BERG Cloud Bridge
berg-cloud-bridge-p9tsmuspj login: root
Password:
#
Success! However, only having serial console access is a pain. Luckily, the bridge has an SSH daemon installed, it's just not running…
Step 4 - SSH Access
First of all, remount the root filesystem as read-write:
mount -o remount,rw /
Now modify /etc/sshd_config to permit remote root login. Change
#PermitRootLogin yes to PermitRootLogin yes
Update: 15th November 2013
SpikesDivZerolet me know that Berg no longer includes sshd under that name in the stock image. Changing theNAMEvariable in the script below todropbearmakes things work again.
We need an init script to start the SSH daemon. I copied /etc/init.d/S49ntp to /etc/init.d/S48sshd and made it look like so:
#! /bin/sh
#
# System-V init script for the SSH daemon
#

PATH=/usr/local/sbin:/usr/local/bin:/sbin:/bin:/usr/sbin:/usr/bin
DESC="SSH Daemon"
NAME=sshd
DAEMON=/usr/sbin/$NAME

# Gracefully exit if the package has been removed.
test -x $DAEMON || exit 0

case "$1" in
  start)
        echo -n "Starting $DESC: $NAME"
        start-stop-daemon -S -q -x $DAEMON
        echo "."
        ;;
  stop) echo -n "Stopping $DESC: $NAME"
        start-stop-daemon -K -q -n $NAME
        echo "."
        ;;
  reload|force-reload) echo -n "Reloading $DESC configuration..."
        start-stop-daemon -K -q -n $NAME -s 1
        echo "done."
  ;;
  restart) echo "Restarting $DESC: $NAME"
        $0 stop
        sleep 1
        $0 start
        ;;
  *) echo "Usage: $SCRIPTNAME {start|stop|restart|reload|force-reload}" >&2
        exit 1
        ;;
esac

exit 0
Now start the SSH daemon:
# /etc/init.d/S48sshd start
Starting SSH Daemon: sshd.
We should now be able to SSH in to the bridge. To find out its IP address, run ifconfig:
# ifconfig
eth0      Link encap:Ethernet  HWaddr 40:D8:55:01:C2:D7
          inet addr:192.168.0.2  Bcast:192.168.0.255  Mask:255.255.255.0
          UP BROADCAST RUNNING MULTICAST  MTU:1500  Metric:1
          RX packets:306 errors:1 dropped:2 overruns:0 frame:0
          TX packets:33 errors:1 dropped:0 overruns:0 carrier:1
          collisions:0 txqueuelen:1000
          RX bytes:75316 (73.5 KiB)  TX bytes:5667 (5.5 KiB)
          Interrupt:21 Base address:0x4000
My bridge was running on IP 192.168.0.2, so I could SSH in to it like so:
Pip: ~ > ssh root@192.168.0.2
root@192.168.0.2's password:
#
Now you can disconnect the serial console, put the bridge back together, and SSH in to it easily to explore.
THE END